FPs Level Design for Quake

Level Designer

The Devil’s Bathhouse is a FPS level that I made for Quake in Trenchbroom, featuring combat and puzzles. This project was an individual student project during my second year of game design studies at BUas. I went through the entire level design process from concepting to blocking out the level, lighting, and set-dressing.

Individual Project

Trenchbroom

2 Months

Overview

The Devil's Bathhouse

Constraints: Set in a castle.

Design Intent: 

  • Creating a fantasy castle with the main element being water. I took inspiration from old sewage systems and ancient Roman baths.
  • I studied Quake extensively to re-create the gameplay feel of the game and create a level that fits the game while telling a story.
  • The level features combat and puzzles.
  • The level is intended as the first level of a mission to  infiltrate the castle.

Narrative: Monsters have overtaken the castle. Break into the castle through the sewers and take them out.

Key Aspects of the Level

Player Guidance

To improve the flow, I implemented player guidance in various ways in the level, such as by funneling (pinching), foreshadowing future locations, baiting, blocked paths, and guiding the player with contrasting colors, lighting, leading lines, and framing.

Puzzles & Scripted Events

To adjust the pacing of the level, I implemented a few scripted events and puzzles between the combat encounters, such as pressing buttons to open a drain to progress, and falling stalactites and water flows as an environmental challenge.

Environmental Storytelling

With each room of the level, I tried to tell a story that supports the narrative of the castle being overtaken by monsters. I 3D modeled props in Trenchbroom, applied textures, and used lighting to make the world come alive.

Secrets

Similarly to the original Quake, there are multiple secrets in my level, which grant the player benefits such as health, ammo, armors, and a biosuit to further explore the water. Finding them eases progression, but they are not necessary for completion.

Blockout

I first blocked out the basic shapes of the rooms so that the level could be played through and playtested.

After the first round of playtesting, I started adding obstacles and more detailed shapes.

I colored modular pieces differently so that the blockout is more readable.

Enemy Encounters

To prevent the player from retreating to the previous corridor with the enemies and to ensure the combat encounter happened in this room as intended, I placed a weapon on the other side of the room as a bait to tempt the player.

When the player picks up the weapon, it triggers a stronger flying enemy to spawn.

After retrieving the golden key, the final room combines elements from earlier parts of the level.

On the upper floor, there are ogres high up in cages throwing grenades at the player, which adds a challenge for the player. All enemies must be defeated to open the final door.

Environmental Challenges

I used existing tools to create new challenges in the level.

Falling Stalactites

By modeling sharp arrows to use as moving platforms, I made falling stalactites that damage the player. The stalactites were first introduced in a room with just one enemy, and finally in the final room with the most difficult challenge.

Water Streams

I made water streams using a combination of a push volume, a water volume, and an animated water texture. They are a recurring element in my level, since the theme of my level is water.

Set Dressing

I applied textures and lighting to the blockout and 3D modeled prop assets inside Trenchbroom to make the world come alive. 

I playtested the level before and after set dressing. It’s important that the set dressing and lighting amplify the player guidance and readability instead of hindering it.

Playtesting & Iteration

Ensuring Quality

To assure quality, I used a Conditions of Satisfaction document .

For each part of the level, I ensured that the edge of the world was defined, there were no leaks, clipping, or invisible collisions, and that everything functions as intended.

I tested the level frequently to see if there were any issues to fix.

Playtesting

I conducted several rounds of playtesting with both new and recurring players during the blockout and set-dressing phases to achieve the intended player experience.

I collected data by noting down observations and asking prepared questions. I then wrote a conclusion based on the data and wrote action points for improvements.

Iteration

  • Improved player guidance and level flow by adding details and objects to guide the player’s line of sight.
  • Improved the shape language of the level from simple blocks to more complex shapes to be more interesting.
  • Improved enemy encounters so that the players use the intended spaces for the encounters instead of drawing enemies out of a room.
  • Balanced the level by moving around health and ammo pickups to more noticeable spots since players always tended to be out of health in a certain room.
  • Improved visibility of certain sections with lighting.
  • Fixed bugs.

Design Process

Research

I researched the Quake player experience, metrics, level flow, and design principles so that I could create a level with a similar feel.
 
I collected reference images of real-life architecture of old castles, sewage systems, and Roman baths and painted over them to break down the architecture so that I could create something similar. 

Node Map

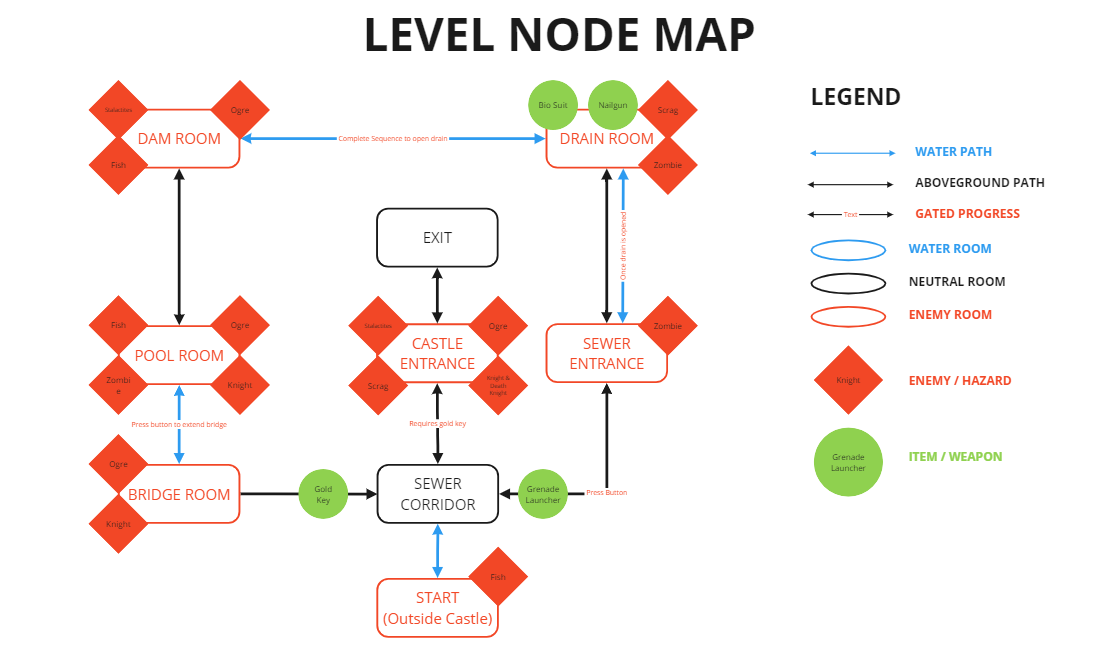
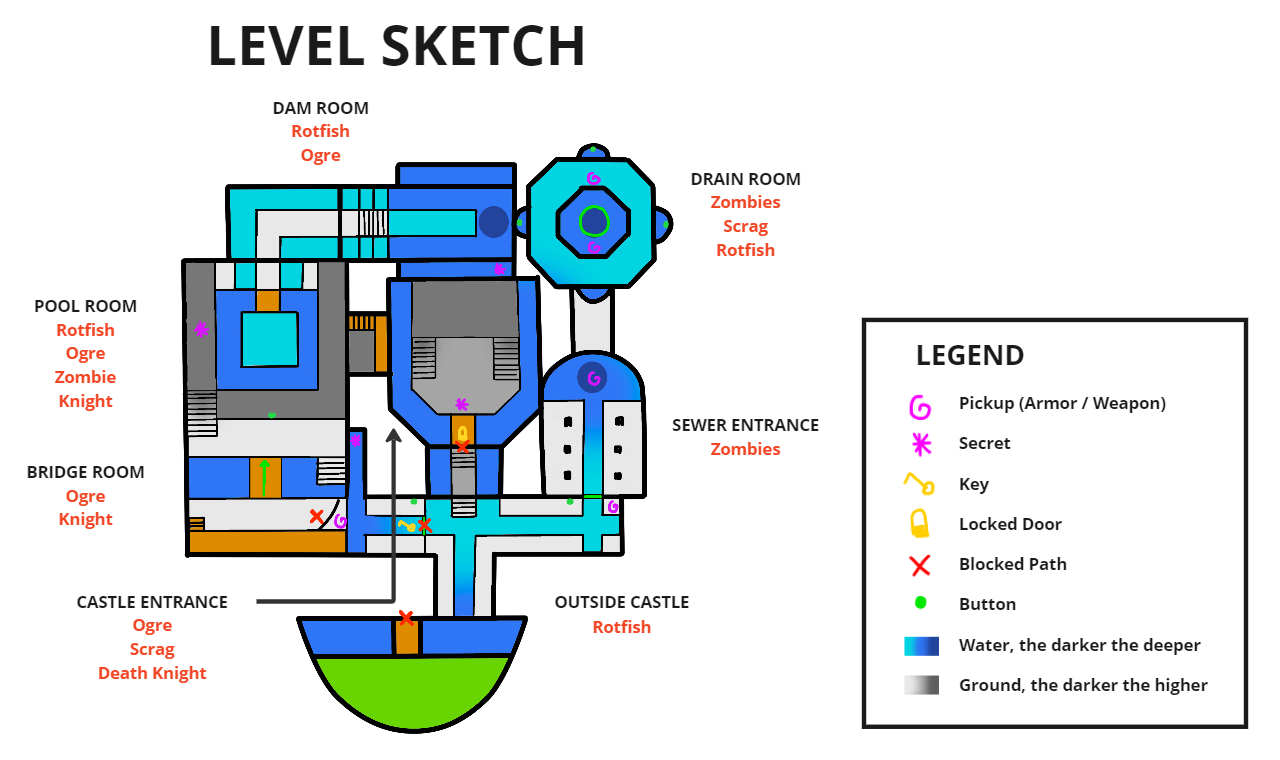
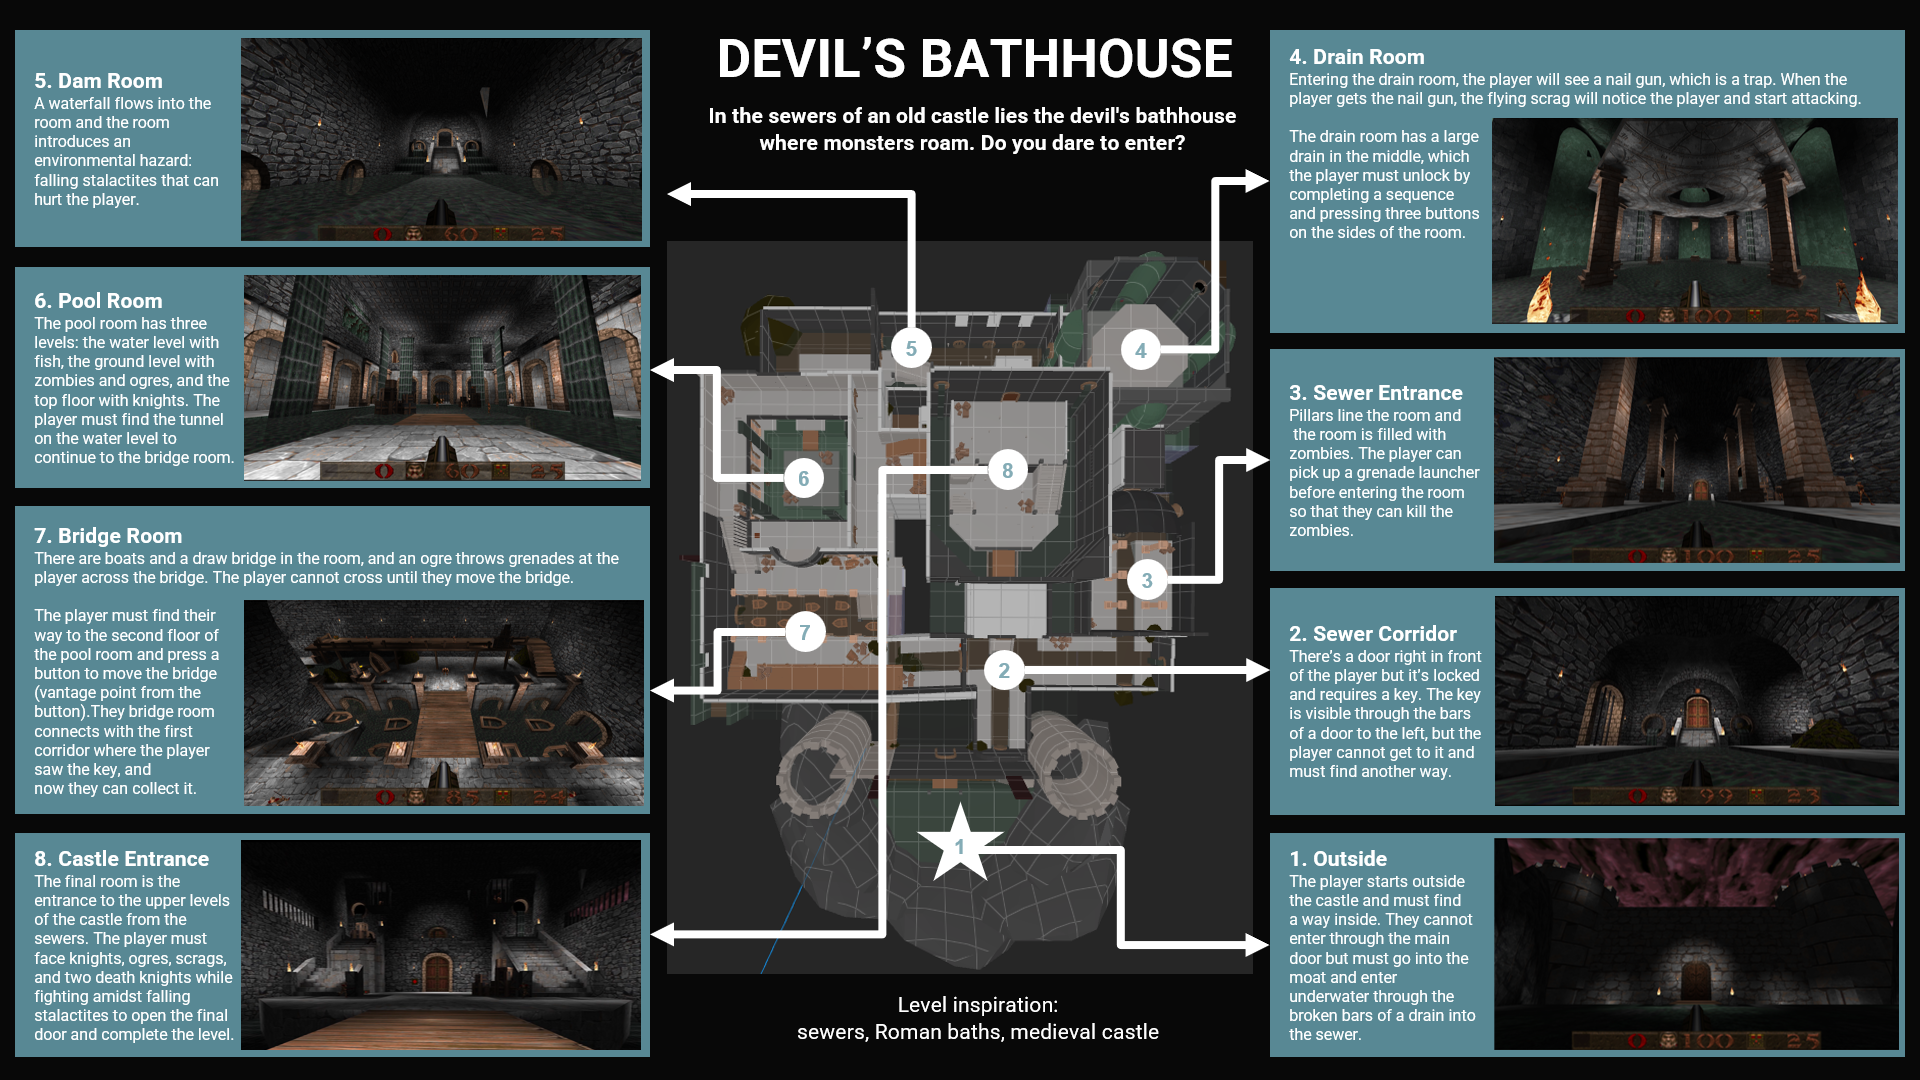
I made a node map of the level that shows an overview of all the connections between the rooms, enemies and hazards, items and weapons, and gated progress.
 
I used the 4-step level design process to design my level, first introducing the main features safely (water and puzzles). 
 
Then developing the player’s understanding of the challenge through a puzzle in the water. 
 
Then, presenting a twist. An environmental challenge is introduced in the form of stalactites that can damage the player, and the player must now navigate around this.
 
Finally, everything is brought together in the final room to challenge the player to use what they have learned throughout the level.
 

Sketching

I sketched rooms and gameplay moments to create interesting puzzles and combat encounters. I used the reference images as my inspiration.
I cleaned up my hand-drawn sketches and drew a top-down layout of the level digitally with Photoshop.
 
This includes the most important item placements, secrets, and enemies.

Gym Level

I made a gym level as an internal testing playground for metrics, systems, and enemy encounters before implementing them in my actual level.

Modular Kit

Based on my architectural research, I modeled a modular kit inside Trenchbroom with the most important architecture that repeats across the level. 

Blockout

I blocked out the level based on the initial sketch, using the modular kit that I had created, and implemented the systems and enemy encounters I had tested in my gym level.

Set Dressing

Using textures, lighting, and 3D modeled prop assets, I made the world come alive.

Playtesting & Iteration

I playtested the level during the blockout and set-dressing phases with both new and recurring players to achieve the intended player experience.

I then iterated on the level based on the collected data.

Result

Learning Outcome

My main learning outcomes for this project were:

  • Learning the four-step level design process.
  • Going through the entire level design pipeline from concept to a final, set-dressed level.
  • Designing challenging combat encounters.
  • Designing level design puzzles.
  • Showcasing narrative through level design with environmental storytelling and the placement of props.
  • Balancing the difficulty of the level through playtesting and iteration and adjusting the placement of enemies, ammo, and health pickups.
  • Learned to use a new level editor.

Complete Playthrough

The level takes around 10 minutes to complete when focusing on the main objective. With more exploration and discovering all the secrets, the level is around 20 minutes long. 

Scroll to Top